What is DHCP Failover?
DHCP Failover allows two DHCP servers to share responsibility for a scope. The two servers replicate lease information, so if one server fails, the other can take over. There are two modes of DHCP Failover:
Hot Standby Mode: One server actively serves IP addresses, while the other is on standby and takes over if the primary fails.
Load Balance Mode: Both servers actively serve IP addresses, sharing the load.
Prerequisites
Before configuring DHCP Failover, ensure the following:
- Two Windows Servers: Both servers must have the DHCP Server role installed.
- Static IP Addresses: Both servers must have static IP addresses.
- Authorised DHCP Servers: Both servers must be authorised in Active Directory.
- Identical Scopes: The primary DHCP server should have the scopes configured, and the secondary server should not have any conflicting scopes.
Step 1: Install the DHCP Server Role on Both Servers
If you haven’t already, install the DHCP Server role on both servers. Here’s how:
- Open Server Manager.
- Click Manage > Add Roles and Features.
- In the Add Roles and Features Wizard, select the DHCP Server role.
- Complete the installation on both servers.
Step 2: Configure Scopes on the Primary DHCP Server
- Open DHCP Manager on the primary DHCP server:
- Go to Server Manager > Tools > DHCP.
- In the left-hand pane, expand your server name and right-click IPv4.
- Select New Scope and configure the scope (e.g., IP range, subnet mask, exclusions, lease duration, etc.).
- Complete the scope configuration.
You can find more details here.
Step 3: Configure DHCP Failover
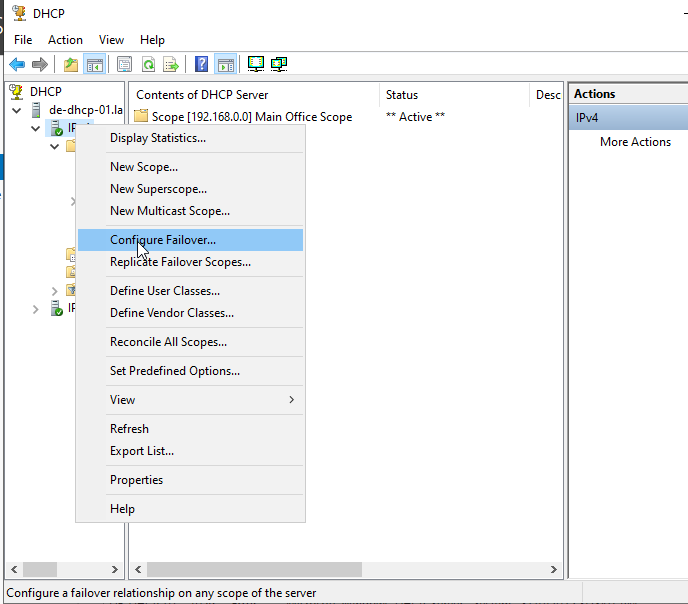
- Open DHCP Manager on the primary DHCP server.
- In the left-hand pane, expand your server name and right-click IPv4.
- Select Configure Failover.
- In the Configure Failover wizard, click Next.
- Select the scopes you want to configure for failover (e.g., the scope you created earlier) and click Next.
- On the Specify the partner server page, enter the name or IP address of the secondary DHCP server and click Next.
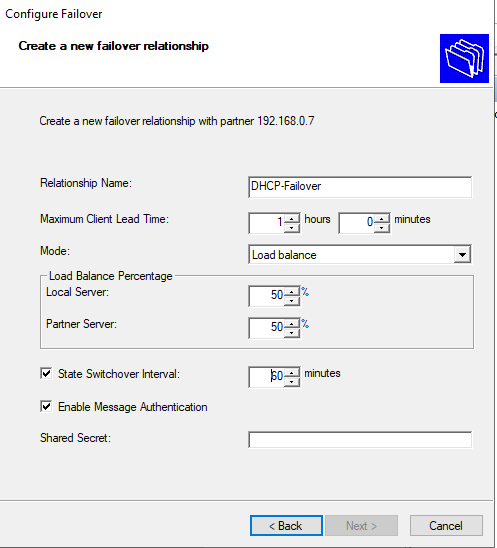
- Configure the Failover Relationship settings:
- Relationship Name: Give the failover relationship a name (e.g.,
DHCP-Failover). - Maximum Client Lead Time: Set the maximum time (in minutes) that one server can extend a lease for a client beyond the lease time known by the other server (default is 1 hour).
- Mode: Choose either Load Balance or Hot Standby.
- For Load Balance, set the load distribution percentage (e.g., 50-50).
- For Hot Standby, specify which server is the Active server and which is the Standbyserver.
- State Switchover Interval: Enable this option to allow automatic failover if one server becomes unavailable.
- Enable Message Authentication: Enable this option to secure communication between the two servers.
- Relationship Name: Give the failover relationship a name (e.g.,
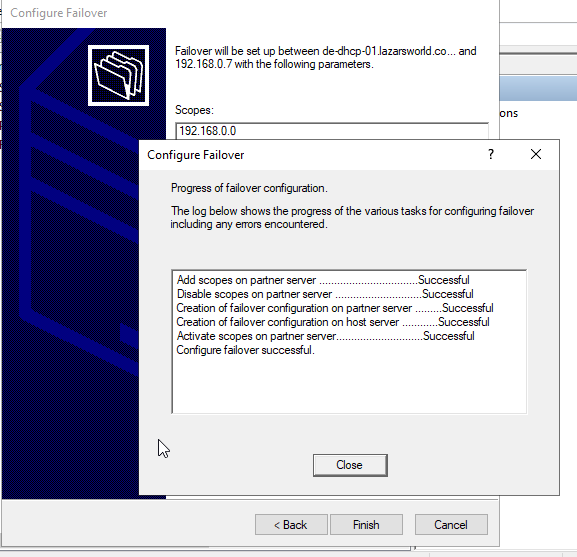
- Click Next and then Finish.
Step 4: Verify DHCP Failover
- Open DHCP Manager on both servers.
- Right Click on IPv4 and check Display Statistics.
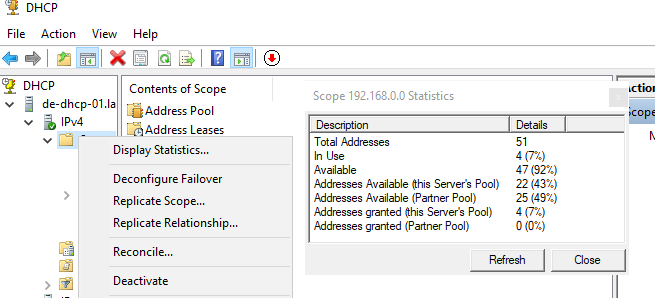
- Verify that the failover relationship is active and working.
Step 5: Test DHCP Failover
- Disconnect the primary DHCP server from the network (or stop the DHCP service).
- On a client machine, release and renew the IP address:
- Open Command Prompt and run:
ipconfig /release ipconfig /renew
- Open Command Prompt and run:
- Verify that the client receives an IP address from the secondary DHCP server.
Best Practices for DHCP Failover
- Use Load Balance Mode for Equal Workload Distribution:
This mode is ideal for most environments where both servers are equally capable. - Use Hot Standby Mode for Redundancy:
This mode is ideal if one server is significantly more powerful than the other. - Monitor Failover Status:
Regularly check the failover status in DHCP Manager to ensure both servers are functioning correctly. - Backup DHCP Configuration:
Use theExport-DhcpServerPowerShell cmdlet to back up your DHCP configuration.
Happy Learning 🙂